 |
UaExpert
1.6.2 438
|
|
UaExpert
1.6.2 438
|
The following screenshot shows the window layout of UaExpert when first started. The window titles link to a more detailed description.

You can rearrange and resize these windows to your liking and close the windows which you don’t need at the moment. To open a previously closed window, right-click on the toolbar and select the window from the context menu.
The menu bar contains the following entries:
The document window can display different view modes. By default, the Data Access View is selected.
UaExpert ships with several plugins. To open a different view in the document window, choose Document → Add… from the menu and choose the document type from the drop-down list. See plugins for the documentation of the different options.
All currently open views are shown in the Project Window under Documents and can be saved in a project file.
The project window displays all server connections and views (see screenshot).
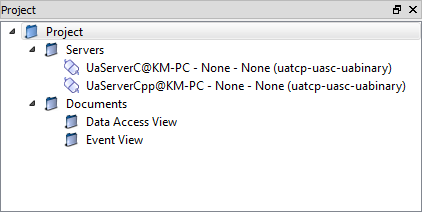
All server connections are listed under Servers. The plug icon in front of each entry indicates whether UaExpert is connected to the server or not or whether an error occurred (the type of error is shown in the Log Window).
From the context menu you can
All open views are listed under documents. Double-click on a previously closed view to open it in the document window. Choose Remove from the context menu to remove an entry from the list.
The address space window shows the address space of the server which is currently selected in the Project Window.
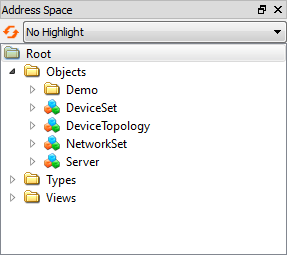
This window can be used to browse the server’s address space. When clicking on the triangle in front of a node, all child elements are shown.
The symbols in front of each node indicate the node class (e.g. Object, Variable, Method …).
It is possible to drag items from here to the document window, e.g. dragging a Variable node to the Data Access View creates a subscription containing a monitored item.
Click on the orange arrow symbol at in front of the drop-down menu to rebrowse.
The drop-down menu at the top of the Address Space Window can be used to highlight the content of a certain namespace: When clicking on the drop-down menu, all namespaces in the server’s namespace table are shown. When a namespace is selected, all nodes belonging this namespace are displayed in a bold font.
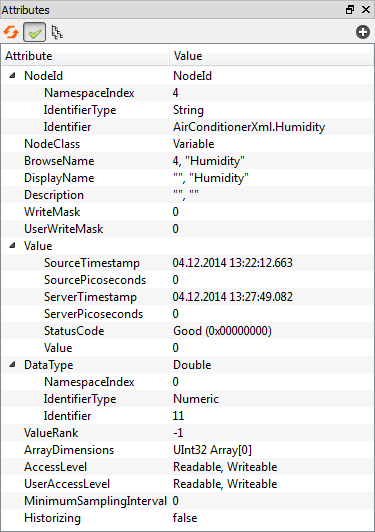
The attributes window shows the attributes of the node which is currently selected in the Address Space Window.
This window contains three buttons:
The references window shows the references of the node which is currently selected in the Address Space Window.
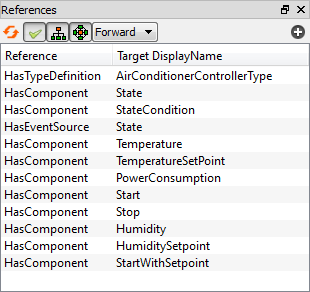
There are four buttons and a drop-down menu:
The log window is used to display status and error messages.
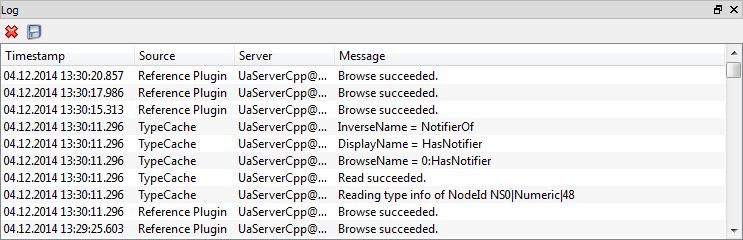
The red cross button can be used to clear the log window. Click on the floppy disc symbol to save the current log to a text file.
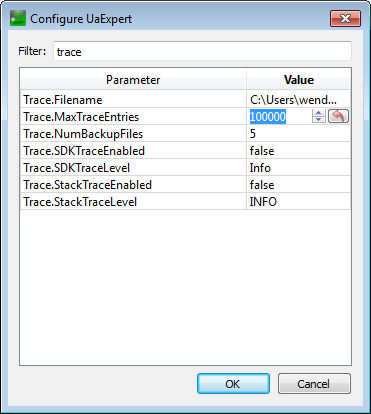
Choose Settings → Configure UaExpert... from the Menu Bar to change various settings of UaExpert.
All available settings are displayed in a list. You can use the Filter field to restrict the list to settings containig the typed string. Click at a table cell to change the current value. Clicking on the red arrow resets the parameter to the default value (see screenshot).
To identify itself to communication partners, each installed OPC UA application or devices needs an Application Instance Certificate and an associated public/private key pair. A communication partner can use the public key to verify the trust relation, check the signature of messages, and encrypt messages. The Application Instance Certificate, including the public and private key, can either be generated by the application (see Initial Start-Up of UaExpert) or provided by a certificate management service like the OPC UA Global Discovery Server (GDS) (see Certificate Manager with GDS).
During Initial Start-Up of UaExpert a so called self-signed certificate is created. This is used as default identity in the Default Certificate Store.
The Certificate Manager is a handy tool to manage certificates known to UaExpert. Choose Settings → Manage Certificates... from the menu, and a new dialog window will open that shows the Default Certificate Store.
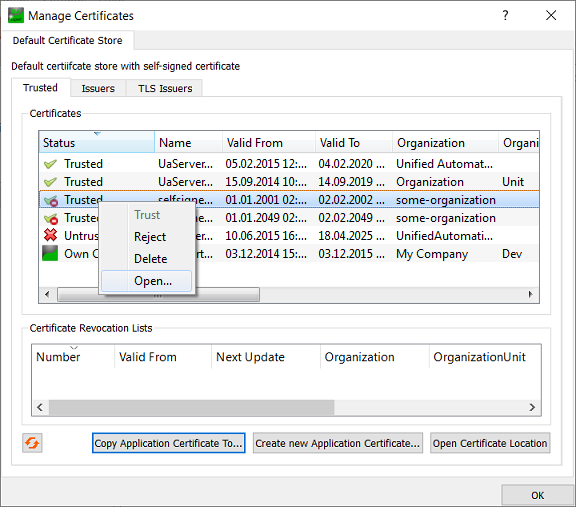
The dialog displays a list of the certificates an certificate revocation lists in UaExpert’s certificate store. There are separate tabs for issuers and TLS issuers.
Different icons indicate the certificates’ statuses:
A right-click on a certificate displays a context menu providing various actions, depending on the status of the certificate (see screenshot): You may trust untrusted certificates, reject already trusted certificates, delete a certificate, or open the certificate in your operating system’s default certificate manager.
When clicking on the orange arrow symbol in the bottom left corner (see screenshot), the contents of the certificate store are reread.
Furthermore, it is possible to create a new application instance certificate (see Initial Start-Up of UaExpert). When clicking on the button Open Certificate Location, the folder containing trusted certificates is opened in your operating system’s file manager.
Certificates issued by the OPC UA application are called self-signed certificates. They are typically generated during installation of the application or at first start. To establish a trust relation between an OPC UA client and server, the self-signed certificates of the communication partner are installed to the trust list. The client certificate is installed to the trust list of the server and the server certificate to the trust list of the client. If the certificate of an application is removed from the trust list, a communication establishment is no longer possible.
Certificates signed by Certificate Authorities (CA) enable central trust management for a group of OPC UA applications or devices. In this case, just the CA certificate must be installed to the trust list of the OPC UA applications. After the CA certificate is installed, all other applications with certificates signed by the CA are able to communicate with each other. To be able to exclude previously trusted applications from the communication, the CA maintains a Certificate Revocation List (CRL). Each installed CA certificate must have an associated, up-to-date CRL installed. This CRL is required for a verification of the trust relation. The OPC UA Global Discovery Server (GDS) definition provides a mechanism for central management of CA signed certificates and update of the corresponding CRLs. CA certificates can build a chain, e.g. a root CA for a company, a CA for a site where the site CA is signed by the root CA and a CA for a production line in the site. An OPC UA application in the production line would only trust the CA for the production line. The other CA certificates are only used to verify the chain.
The Certificate Manager allows adding a second application identity that is signed by a CA managed by a GDS. The management includes updates of trust list and CRLs.
To enable GDS management, open the settings Settings → Configure UaExpert... and change the setting General.MaxGdsServers to the number of GDS servers you want to use.
After restart of UaExpert the GDS management tab is added (open Settings → Manage Certificates...)

On the tab 'GDS Server 1', it is possible to register UaExpert with a GDS using the button 'Register at GDS'. The GDS endpoint can be selected in the discovery dialog. After the selection of the GDs, UaExpert registers with the GDS and requests a signed certificate.
The status of the registration is shown the Information group.
The cycle time for updating the trust list from the GDS can be configured. This includes checks for necessary UaExpert certificate update.