The goal of this lesson is to show how to provide Events in the Address Space.
Content:
Step 1: Adding HeaterSwitchedEventType
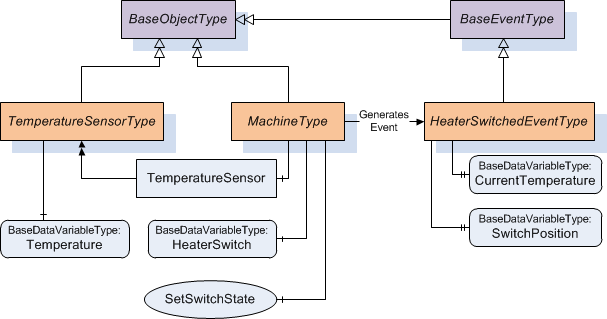
Figure 5-1 shows the machine type and the new event type that we will create in this lesson.
Figure 5-1 Machine Type and HeaterSwitchedEventType
In our example, a machine shall send an event if it's switch was toggled. Therefor we create a new event type that contains information about the new switch position, also it will contain the current value of the temperature sensor. The new event type will be a subtype of the BaseEventType. For further information about event handling in the SDK, please see Alarms & Events.
New event types and new event fields need to get registered at the SDK, this is done in CustomProvider_RegisterEventTypes:
a_pStartingNodeId->Identifier.Numeric++;
g_HeaterSwitchedEventTypeId = a_pStartingNodeId->Identifier.Numeric;
parentEventTypeId.NamespaceIndex = 0;
parentEventTypeId.Identifier.Numeric = OpcUaId_BaseEventType;
OpcUa_GotoErrorIfBad(uStatus);
The HeaterSwitchedEventType will have two additional event fields:
- SwitchPosition: The new state of the machine's switch that issued the event
- CurrentTemperature: The temperature of the machine's sensor when the event was sent
The event fields are registered at the SDK using their browse names and the returned local index is stored for later use.
eventField.
BrowsePath.
Elements = (OpcUa_QualifiedName*)OpcUa_Alloc(
sizeof(OpcUa_QualifiedName));
OpcUa_String_FromCString("SwitchPosition"),
OPCUA_STRING_LENDONTCARE);
&eventField);
OpcUa_String_FromCString("CurrentTemperature"),
OPCUA_STRING_LENDONTCARE);
&eventField);
In order to inform clients about the new event type, the according nodes of the type and the event fields have to be created in the server's address space:
nodeId.NamespaceIndex = 0;
nodeId.Identifier.Numeric = OpcUaId_BaseEventType;
&pEventType,
(OpcUa_BaseNode*)pBaseNode,
a_pStartingNodeId->Identifier.Numeric,
g_uCustomProvider_NamespaceIndex,
"HeaterSwitchedEventType");
OpcUa_GotoErrorIfBad(uStatus);
a_pStartingNodeId->Identifier.Numeric++;
&pProperty,
(OpcUa_BaseNode*)pEventType,
a_pStartingNodeId->Identifier.Numeric,
g_uCustomProvider_NamespaceIndex,
"SwitchPosition");
OpcUa_GotoErrorIfBad(uStatus);
a_pStartingNodeId->Identifier.Numeric++;
&pProperty,
(OpcUa_BaseNode*)pEventType,
a_pStartingNodeId->Identifier.Numeric,
g_uCustomProvider_NamespaceIndex,
"CurrentTemperature");
OpcUa_GotoErrorIfBad(uStatus);
Step 2: Adding Event References to the Address Space
Nodes that are able to emit events need to be marked as such in the address space. In our case, following references need to be created:
- GeneratesEvent from MachineType to HeaterSwitchedEventType
- HasEventSource from MachineType to it's HeaterSwitch property The according references also have to be drawn for the instance of the MachineType in CustomProvider_CreateMachine.
OpcUa_StatusCode CustomProvider_CreateMachineType(OpcUa_NodeId *a_pStartingNodeId,
OpcUa_ObjectType **a_ppMachineType,
OpcUa_ObjectType **a_ppTemperatureSensorType)
{
...
nodeId.NamespaceIndex = g_uCustomProvider_NamespaceIndex;
nodeId.Identifier.Numeric = g_HeaterSwitchedEventTypeId;
referenceNodeId.Identifier.Numeric = OpcUaId_GeneratesEvent;
OpcUa_GotoErrorIfBad(uStatus);
...
referenceNodeId.Identifier.Numeric = OpcUaId_HasEventSource;
OpcUa_GotoErrorIfBad(uStatus);
Furthermore, the SDK and clients need to know that the machine instance is able to emit events. For this the EventNotifier attribute of the machine node is set and the machine is registered as EventNotifier in the SDK. Also, the HeaterSwitch is registered as EventSource in the SDK.
OpcUa_StatusCode CustomProvider_CreateMachine(OpcUa_StringA a_sMachineName,
OpcUa_StringA a_sTemperatureSensorName,
OpcUa_BaseNode *a_pOwner,
OpcUa_NodeId *a_pMachineTypeId,
OpcUa_NodeId *a_pTemperatureSensorTypeId,
OpcUa_NodeId *a_pStartingNodeId,
Machine **a_ppNewMachine)
{
...
nodeId.NamespaceIndex = 0;
nodeId.Identifier.Numeric = OpcUaId_Server;
OpcUa_GotoErrorIfBad(uStatus);
OpcUa_NodeId_Clone(a_pStartingNodeId, &nodeId);
Step 3: Firing Events
Now all preparation is done and we are able to fire events. In our example, the simulation timer is used to check if the switch of the machine was toggled. If this is true, a HeaterSwitchedEvent is fired:
IFMETHODIMP(CustomProvider_SimulationTimerCallback)(OpcUa_Void *a_pvCallbackData,
OpcUa_Timer a_hTimer,
OpcUa_UInt32 a_msecElapsed)
{
static OpcUa_Boolean bLastSwitchPosition = OpcUa_False;
...
if (bLastSwitchPosition != g_bMyCustomMachineSwitch)
{
CustomProvider_FireHeaterSwitchedEvent(g_pMyCustomMachine);
}
bLastSwitchPosition = g_bMyCustomMachineSwitch;
The helper function CustomProvider_FireHeaterSwitchedEvent is used to generate and fire the event. It creates a new instance of the HeaterSwitchedEventType using the NodeId it assigned to the event type:
OpcUa_StatusCode CustomProvider_FireHeaterSwitchedEvent(Machine *a_pMachine)
{
...
eventTypeId.NamespaceIndex = g_uCustomProvider_NamespaceIndex;
eventTypeId.Identifier.Numeric = g_HeaterSwitchedEventTypeId;
Now the event fields of the event are filled with reasonable values. For setting the event fields of the BaseEventType, convenience functions are provided by the SDK.
A unique EventId is created by using the SDK's helper function UaServer_Events_CreateEventId and depending on the state of the switch, a message is generated. Please remember that the OpcUa_ByteString created by UaServer_Events_CreateEventId needs to be freed by the caller after use.
if (*a_pMachine->pHeaterSwitch->pValue == OpcUa_False)
{
}
else
{
}
The custom event fields are filled by using the local indices we retrieved when registering the event fields in Step 1: Adding HeaterSwitchedEventType.
value.Datatype = OpcUaType_Boolean;
value.Value.Boolean = *a_pMachine->pHeaterSwitch->pValue;
value.Datatype = OpcUaType_Double;
value.Value.Double = *a_pMachine->pTemperatureSensor->pValue;
Finally, the event is fired by calling UaServer_Events_FireEvent. As events are fired once and the forgot, we can delete it directly after emitting:
Step 4: Receiving Events with a Client
After implementing firing of events, we can test it by using a client to receive them.
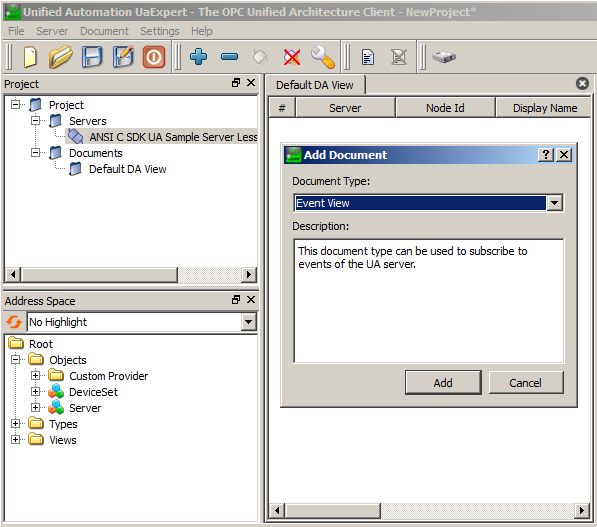
Figure 5-2 Create an Event View using UaExpert
For receiving events with UaExpert, create an Event View by clicking 'Add Document', selecting 'Event View' and clicking 'Add'.
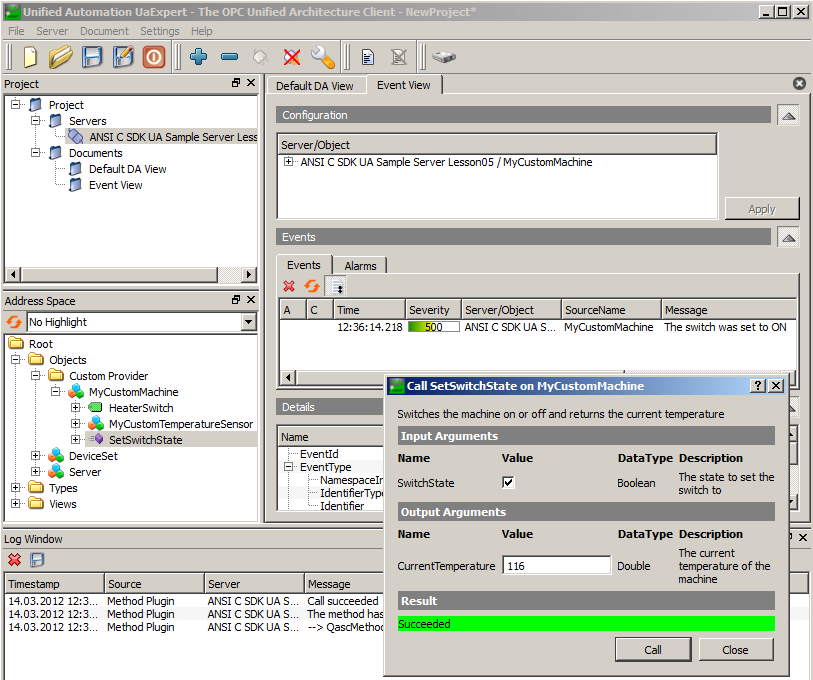
Figure 5-3 Receive Events using UaExpert
Now you can drag&drop either the 'Server' or the 'MyCustomMachine' object into the Configuration section of the Event View. The client will then subscribe for events that are emitted by the according object. To trigger an event, you can simply call the method we created in Lesson 4: Adding Support for Methods and toggle the state of the switch. After the method call, our custom event will be fired and displayed in the client.